Developers
If you would like to help create or maintain the code for Attack Flow, including the Attack Flow library (Python) and the Attack Flow builder (ECMAScript/Node.js), this document explains how to set up an environment to work on this code and the frequent tasks that you will need to perform.
Attack Flow Library
The Attack Flow Library is written in Python and contains tools for:
Validating Attack Flow JSON files
Generating schema documentation
Visualizing Attack Flows using GraphViz, Mermaid, or ATT&CK matrix
Running unit tests
Set up
The Attack Flow Library requires Python >=3.12. You will also need to install Python Poetry in order to handle dependencies and setting up a virtualenv. Clone the repository as follows:
$ git clone git@github.com:center-for-threat-informed-defense/attack-flow.git
Cloning into 'attack-flow'...
remote: Enumerating objects: 11137, done.
remote: Counting objects: 100% (808/808), done.
remote: Compressing objects: 100% (411/411), done.
remote: Total 11137 (delta 389), reused 740 (delta 363), pack-reused 10329
Receiving objects: 100% (11137/11137), 15.68 MiB | 4.63 MiB/s, done.
Resolving deltas: 100% (2625/2625), done.
Once you have the repository cloned, go into that directory and install the Python dependencies. This step will also create a virtualenv for the project so that the dependencies do not conflict with other Python packages you may have installed.
$ cd attack-flow
$ poetry install
Creating virtualenv attack-flow-arUjfNL5-py3.9 in /Users/mhaase/Library/Caches/pypoetry/virtualenvs
Installing dependencies from lock file

Package operations: 72 installs, 0 updates, 0 removals

• Installing six (1.16.0)
• Installing certifi (2022.5.18.1)
• Installing charset-normalizer (2.0.12)
• Installing idna (3.3)
• Installing markupsafe (2.1.1)
• Installing pyparsing (3.0.9)

...

Installing the current project: attack-flow (3.0.0)
Finally, enter the virtualenv. You can check if the installation succeeded by running
the af command.
$ poetry shell
py[attack-flow] $ af version
Attack Flow version 3.0.0
Warning
The rest of the Attack Flow Library documentation assumes that you are in a Poetry
shell. Make sure to run poetry shell in each terminal session.
Validate JSON files
Validate one or more Attack Flow JSON files:
$ af validate corpus/*.json
corpus/cobalt-kitty-attack-flow.json: OK
corpus/conti_2021.json: OK
corpus/dfir_report_zero_to_domain_admin.json: OK
corpus/mac_malware_steals_cryptocurrecy.json: OK
corpus/right-to-left-override.json: OK
corpus/tesla.json: OK
There is a Makefile target make validate that validates the corpus.
Visualize with GraphViz
In addition to the Attack Flow Builder, there are a few other options for visualizing Attack Flows. The first approach is converting to GraphViz format:
$ af graphviz corpus/tesla.json tesla.dot
The example command converts the Attack Flow tesla.json into GraphViz format
tesla.dot. If you have GraphViz installed, you can use one of its layout tools to
create an image:
$ dot -Tpng -O tesla.dot
This command will render tesla.dot as a PNG graphics file called tesla.dot.png.
It will look something like this:
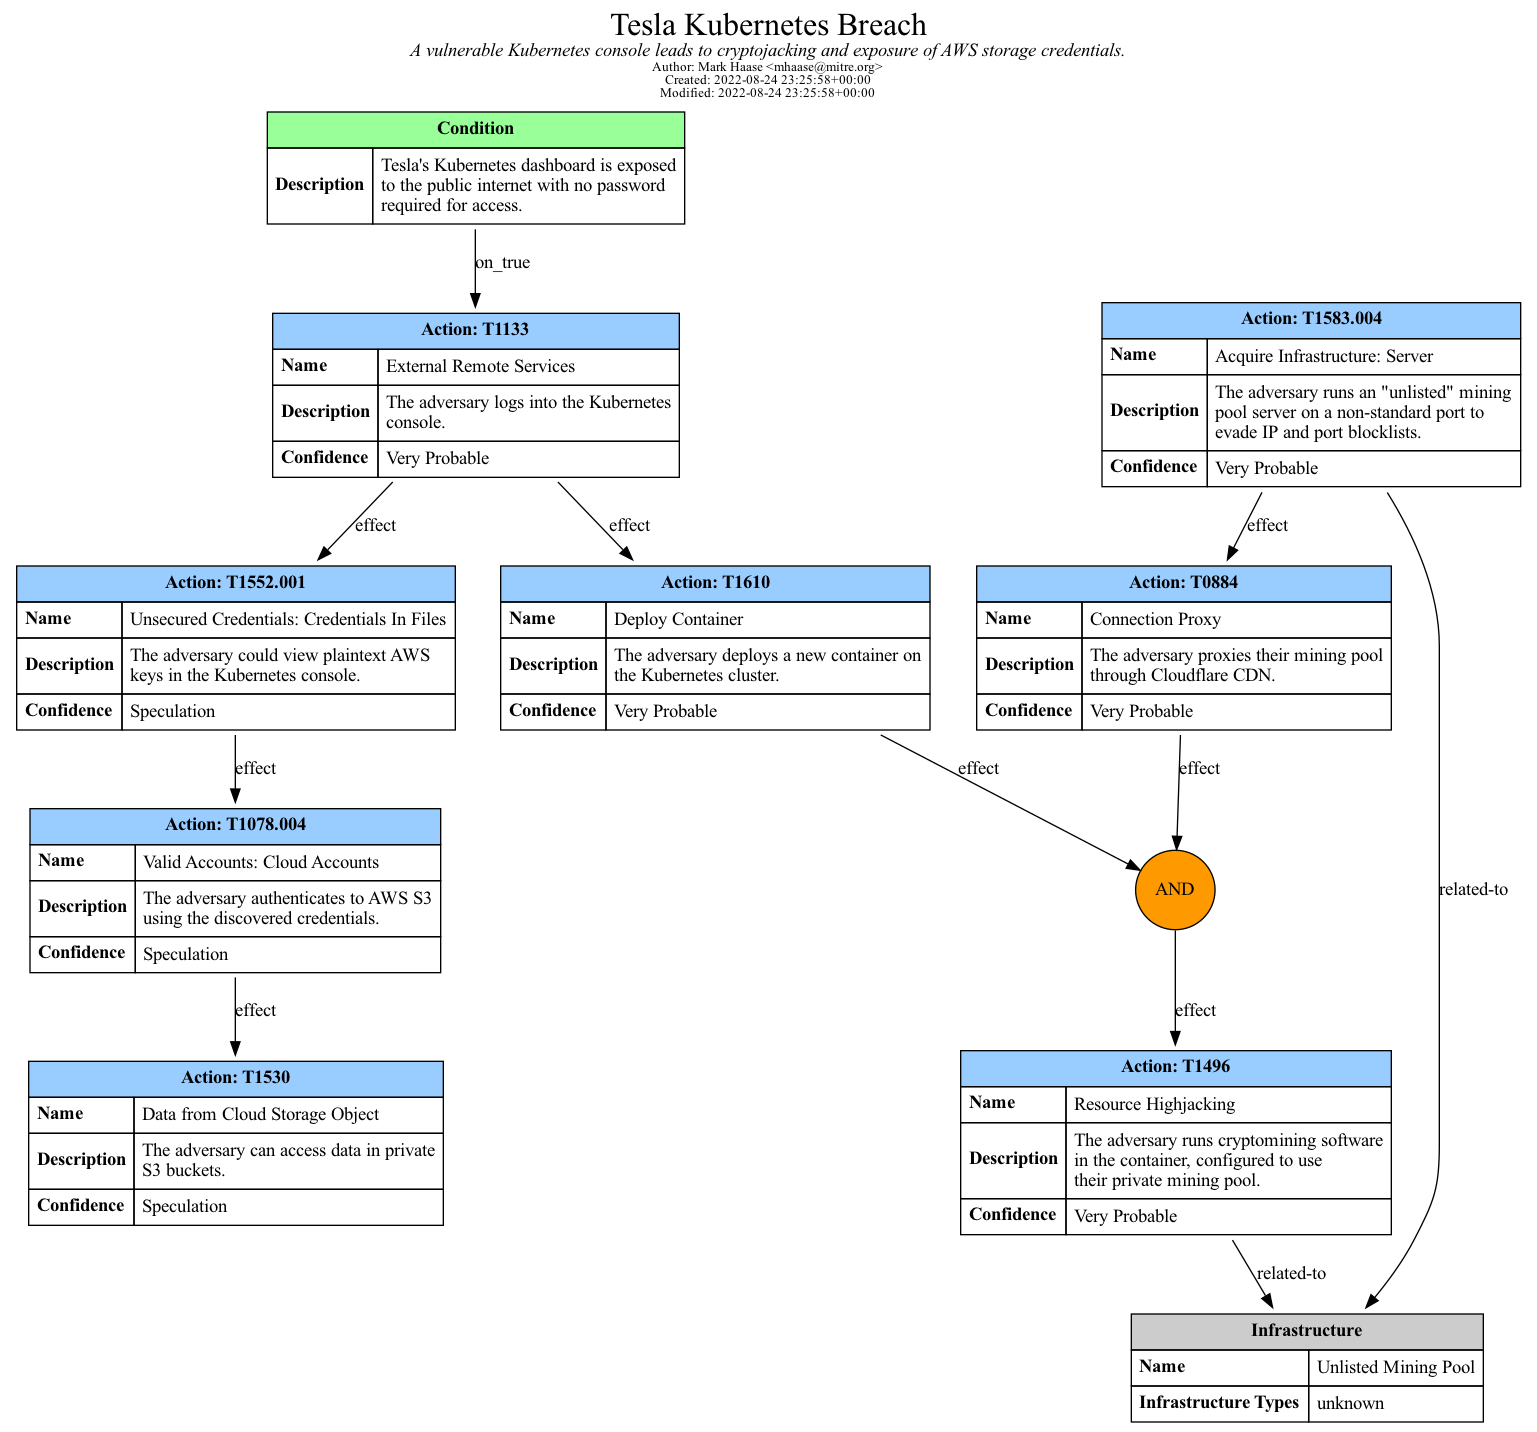
The result of converting tesla.json into tesla.dot.png.
Visualize with Mermaid
Another approach for visualizing flows is to convert to Mermaid format. Mermaid is a newer format with fewer features than GraphViz, but does have the benefit that it can be embedded directly into GitHub-Flavored Markdown.
$ af mermaid corpus/tesla.json tesla.mmd
You can copy/paste the resulting graph into a Markdown file, or if you have Mermaid installed locally, you can render it as an image.
$ mmdc -i tesla.mmd -o tesla.mmd.png
This command will render tesla.mmd as a PNG graphics file called tesla.mmd.png.
It will look something like this:
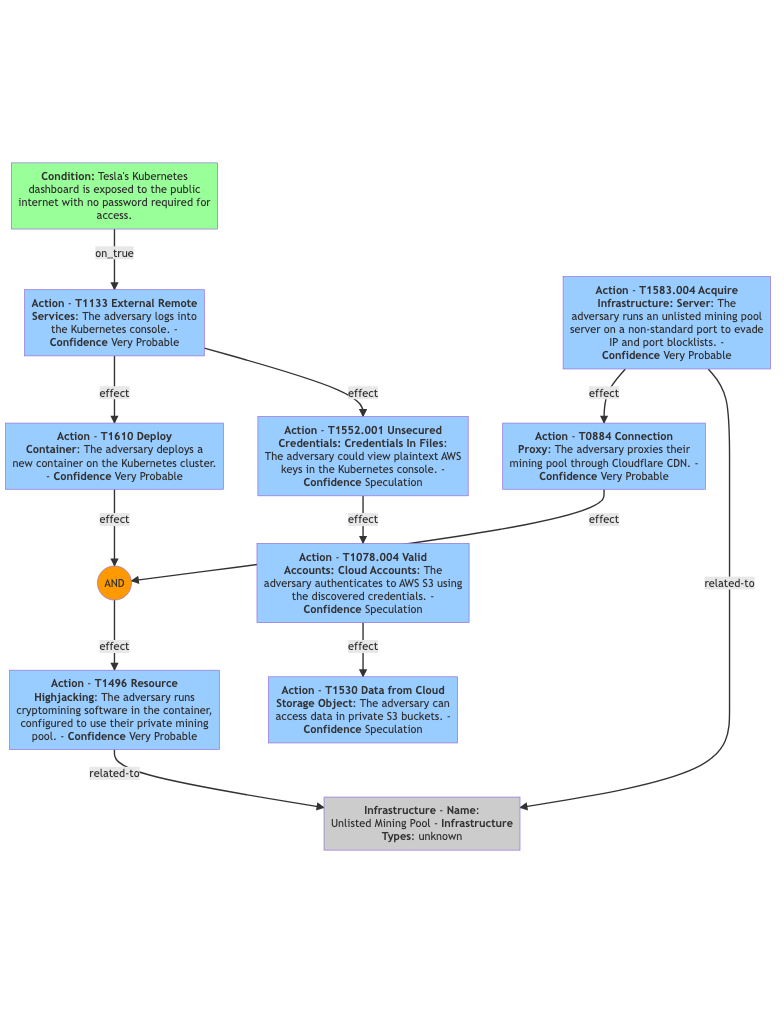
The result of converting tesla.json into tesla.mmd.png.
Visualize with ATT&CK Navigator
You can also visualize an Attack Flow as an overlay on top of an ATT&CK navigator layer. In order to do this, you must open your layer in Navigator and export it to SVG:
Open your layer in Navigator.
Click the camera icon to open the SVG settings screen.
Adjust the options as you like.
Click the download icon to save as a
.svgfile.
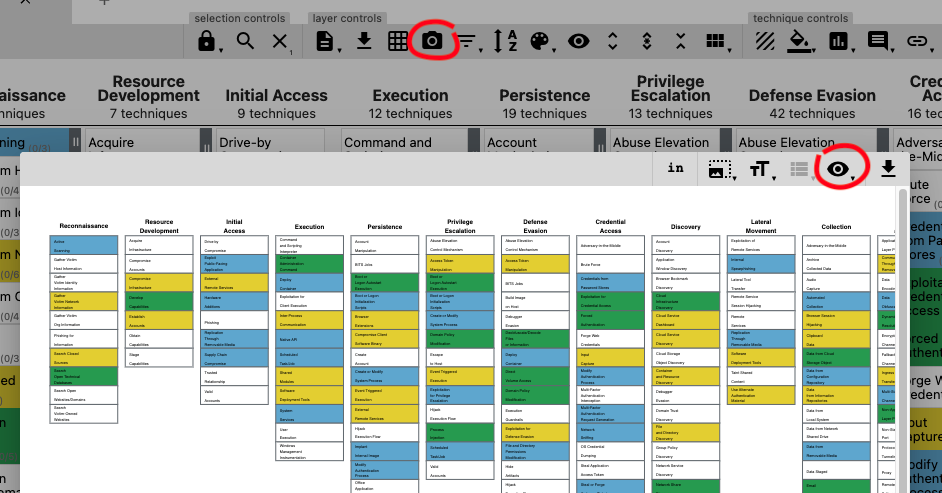
How to export SVG from ATT&CK Navigator.
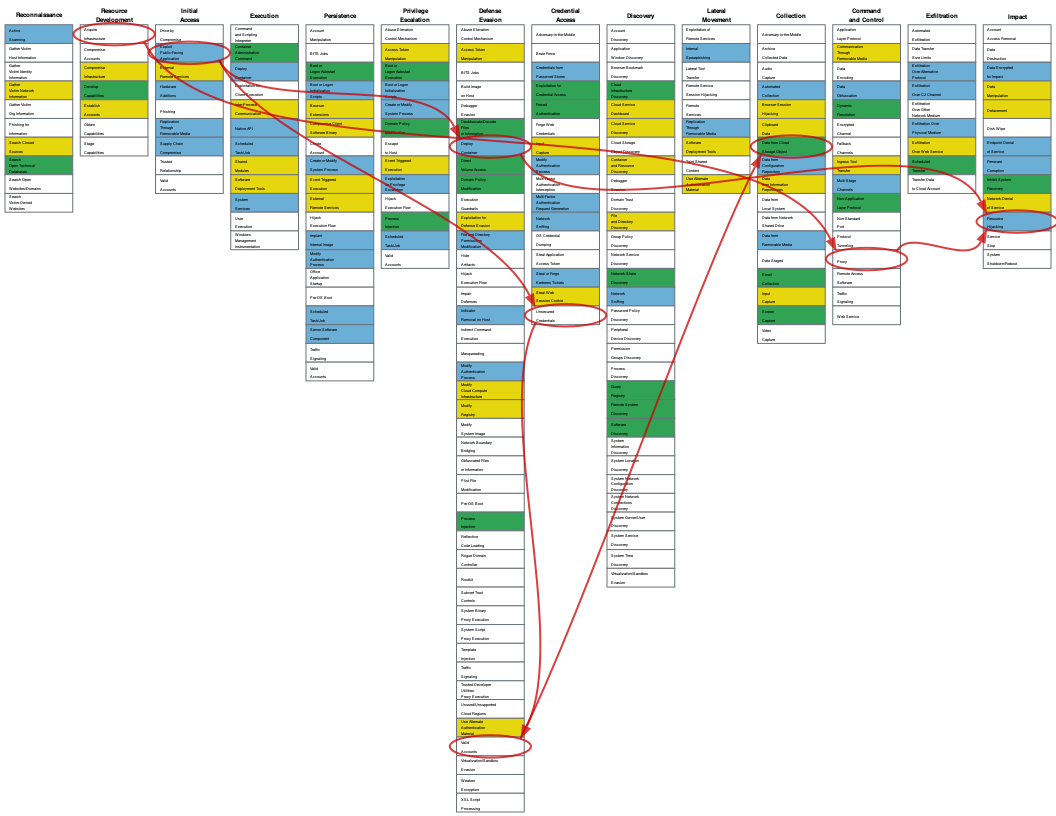
Here is an example of an SVG file – this one has several columns cropped out.
With your SVG file prepared, let’s call it base_matrix.svg you can now render any
flow on top of it:
$ af matrix matrix-base.svg corpus/tesla.json matrix-example.svg
This command reads in matrix-base.svg, renders the corpus/tesla.json Attack Flow
on top of it, and writes the resulting image to matrix-example.svg.
Note
If your flow references subtechniques that are not displayed in the Navigator layer, then the script will automatically try to use the parent technique.
The output of the command will look something like this:
A Navigator layer with the the Tesa flow rendered as an overlay.
Generate schema documentation
The Attack Flow Library can convert the JSON schema file into human-readable
documentation and insert it into language.rst.
$ af doc-schema schema/attack-flow-2022-01-05-draft.json docs/language.rst
This is automatically done at build time when publishing documentation, but you may want to run this locally while modifying the JSON schema.
Build documentation
The technical documentation (i.e. what you’re reading right now) is written in a language called reStructuredText (which is similar to Markdown but with more features) and compiled using Sphinx to produce documentation in HTML or PDF format. To build and view the documentation:
$ make docs-server
[sphinx-autobuild] > sphinx-build -b dirhtml -a /Volumes/Code/ctid/attack-flow/docs /Volumes/Code/ctid/attack-flow/docs/_build
Running Sphinx v4.5.0
loading pickled environment... done
building [mo]: all of 0 po files
building [html]: all source files
updating environment: 0 added, 0 changed, 0 removed

...

[I 220601 13:35:21 server:335] Serving on http://127.0.0.1:8000
[I 220601 13:35:21 handlers:62] Start watching changes
[I 220601 13:35:21 handlers:64] Start detecting changes
Once the server is running, you can open http://localhost:8000 in your browser to view
the documentation. When you edit and save any .rst document, the docslive server
will recompile it and refresh the browser so that you can see the changes almost
immediately. This makes for an efficient editing workflow.
The documentation can also be built into PDF, but it’s a slower and more complicated process. You will need to have Docker installed and the first time you run this command it will need to download a Docker image for building Sphinx PDFs.
$ make docs-pdf
...
The resulting PDF can be found in docs/_build/latex/attackflow.pdf. Alternatively,
you can download PDFs from the GitHub actions.
Run unit tests
Run the unit tests using Pytest:
$ poetry run pytest --cov=src/ --cov-report term-missing
There is a Makefile target make test that is a shortcut for the command above, as
well as make test-ci which runs the same tests but exports the code coverage data to
an XML file.
Attack Flow Builder
Dev Server
The Attack Flow Builder is written in JavaScript. To set up a development environment, you first need to install Node.js and npm. Then, perform the following setup steps:
$ cd src/attack_flow_builder
$ npm install
...
Finally, to run the application:
$ npm run dev
VITE v6.0.11  ready in 343 ms

➜  Local:   http://localhost:5173/
➜  Network: use --host to expose
➜  Vue DevTools: Open http://localhost:5173/__devtools__/ as a separate window
➜  Vue DevTools: Press Option(⌥)+Shift(⇧)+D in App to toggle the Vue DevTools
➜  press h + enter to show help
If this starts up successfully, then you can access the application at http://localhost:5173/. As you edit source code and save, the server will automatically rebuild the application and you can refresh the browser to run it again.
Update Intelligence File
The Intelligence File (builder.config.intel.ts) drives the application’s autocomplete features. This file is generated automatically by a set of scripts which download and organize relevant source information into a format the application can leverage.
To update the Intelligence File for a given source, simply invoke its npm script as in package.json:
$ npm run update-attack

> attack-flow-builder@3.0.0 update-attack
> node ./attack/update_mitre_attack.mjs

→ Downloading ATT&CK Data...
→ .../attack-stix-data/master/enterprise-attack/enterprise-attack-16.0.json
→ ...m/mitre-attack/attack-stix-data/master/ics-attack/ics-attack-16.0.json
→ ...e-attack/attack-stix-data/master/mobile-attack/mobile-attack-16.0.json
→ Generating enumerations file...

MITRE ATT&CK enumerations updated successfully.
The configured list of sources can be modified at any time from sources.mjs.
Preload a Flow
As you are working, you may need to test a specific Attack Flow through multiple edit/compile/refresh cycles, and repeatedly opening the same file in the Builder can be tedious. Here’s a trick to automatically load a specific flow each time you refresh the page. First, go into the corpus directory and start a mini web server. (The first time you run this, it may prompt you to install the Node.js server package. Go ahead and do that.)
$ cd corpus/
$ npx serve --cors
Now open the URL http://localhost:3000/. You will see a listing of files in the corpus.
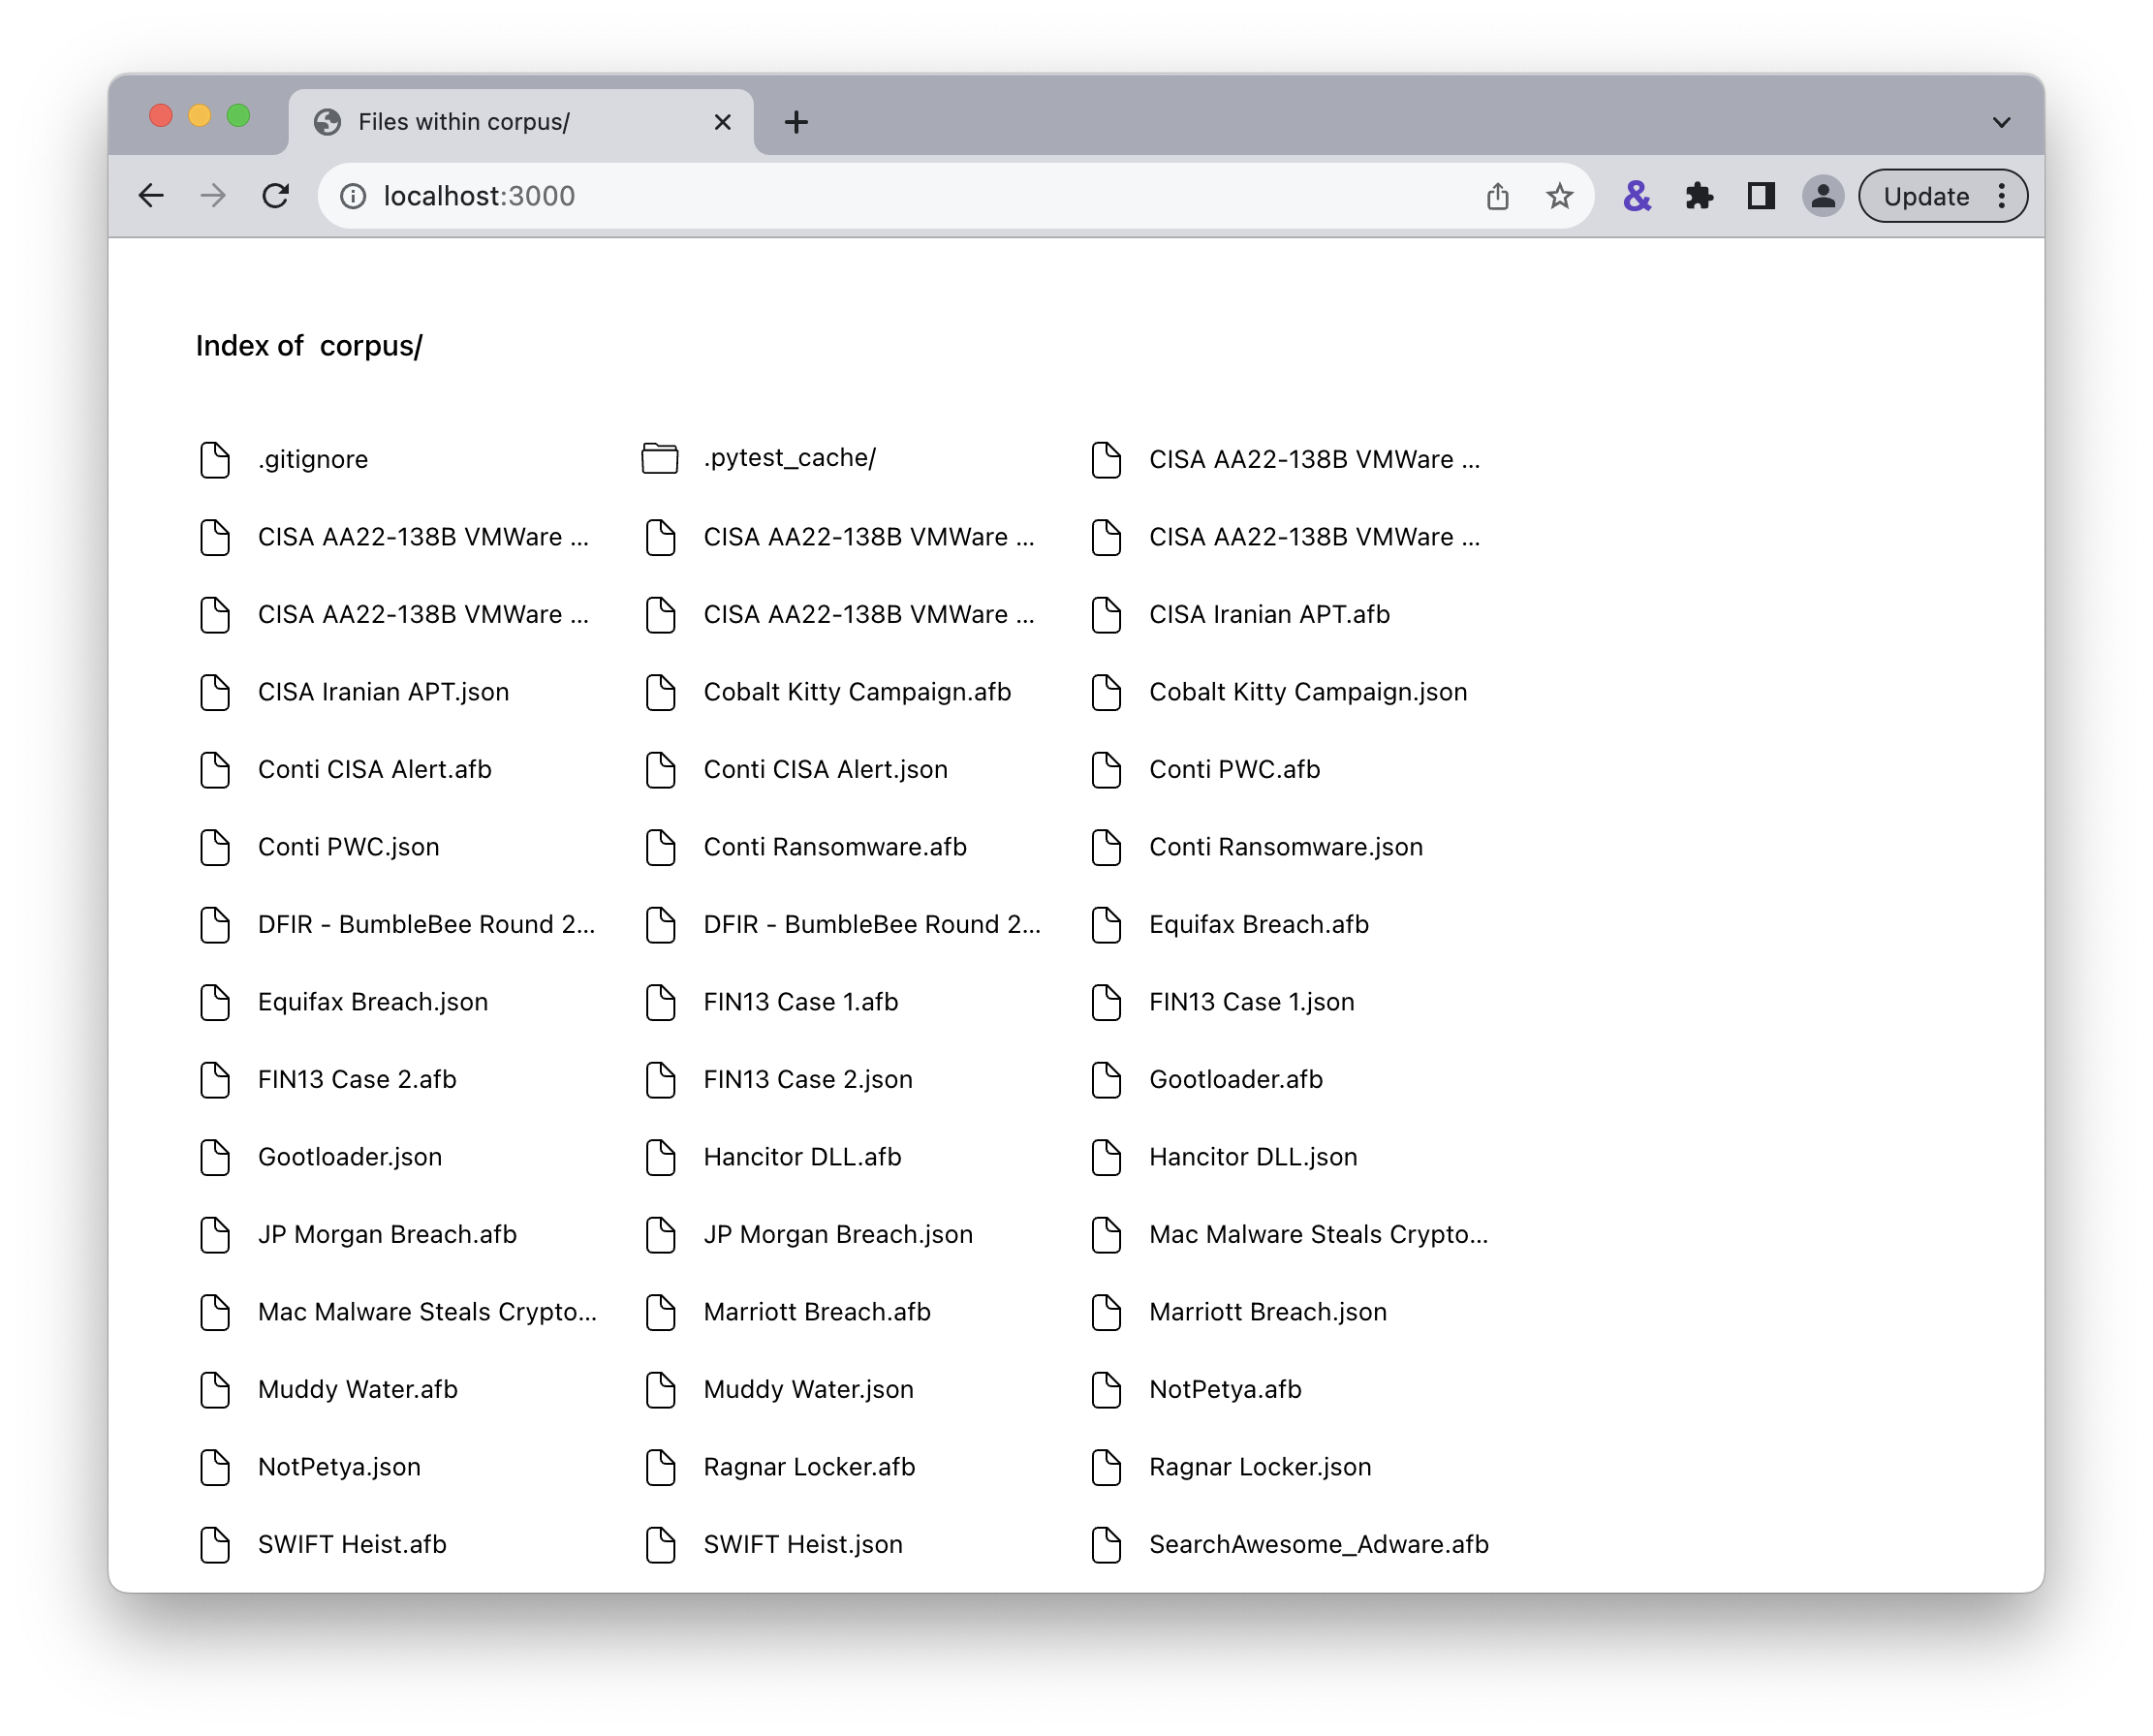
The mini server lists files in the corpus directory.
Right click on the file you want to preload and copy the link. Go back to Attack Flow Builder and edit the URL
to append ?src= and then paste the URL to your selected flow.
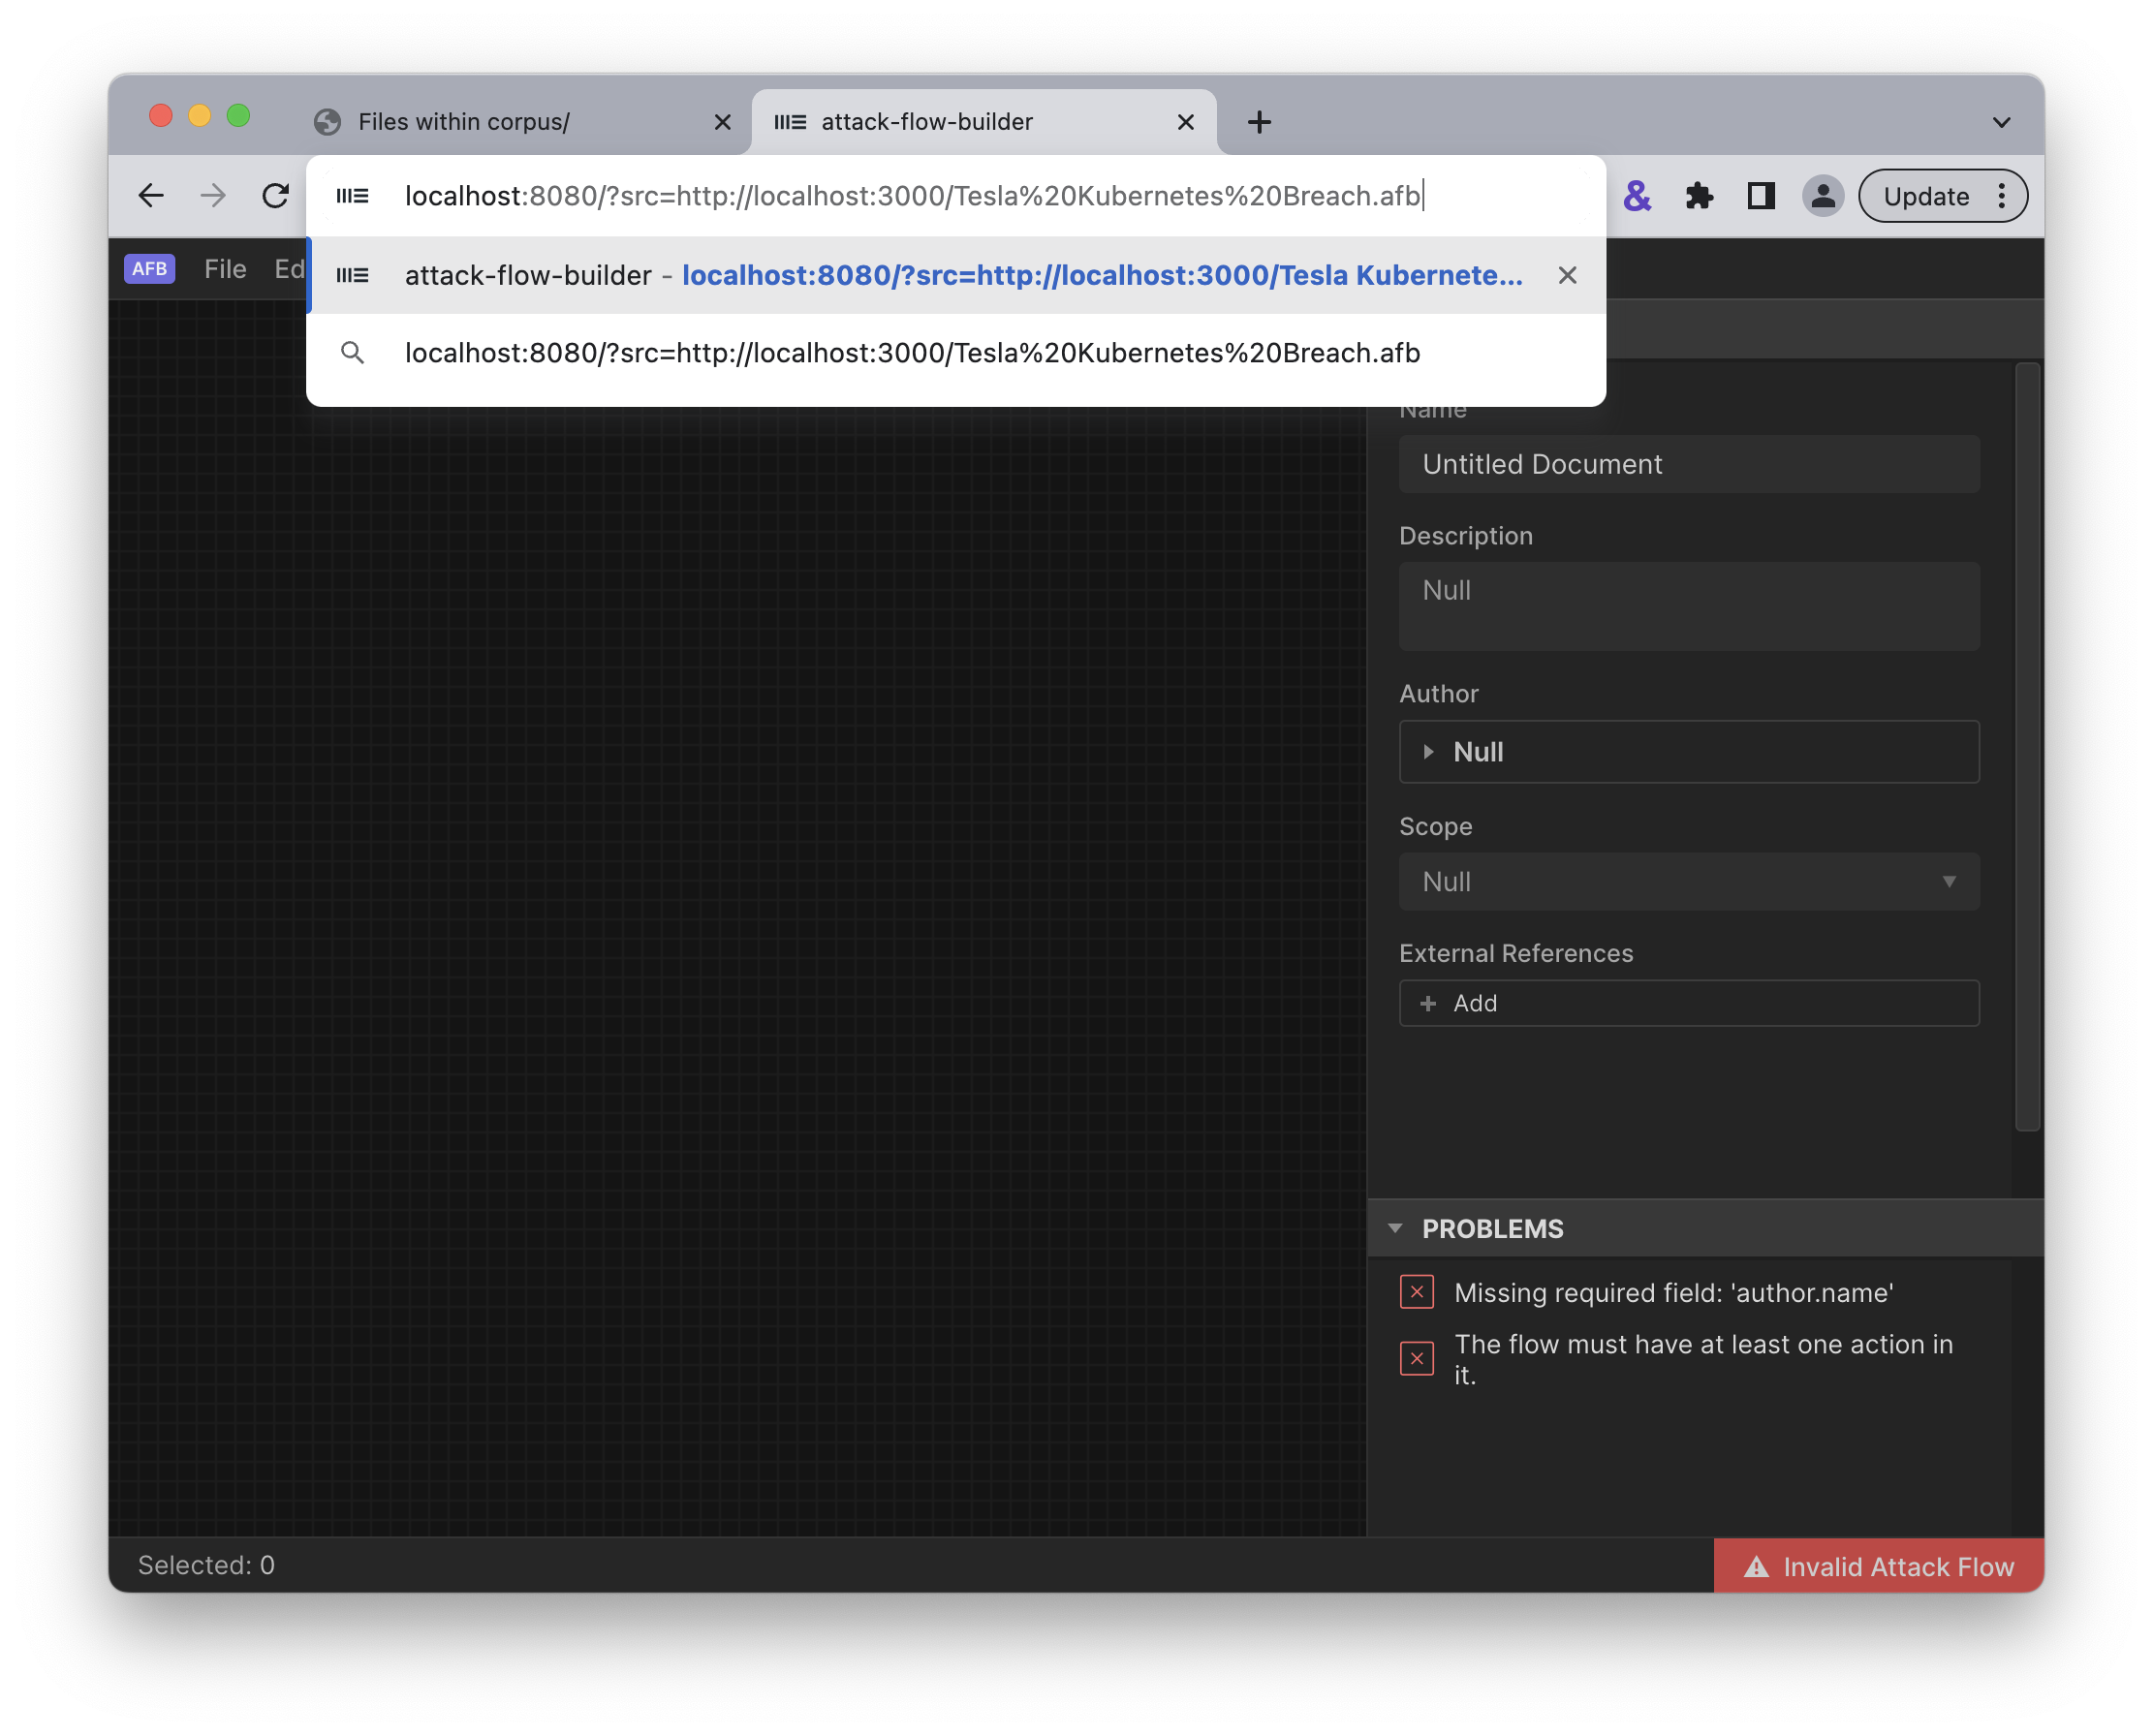
Edit the Attack Flow Builder URL
Press enter and the builder will load the selected flow.
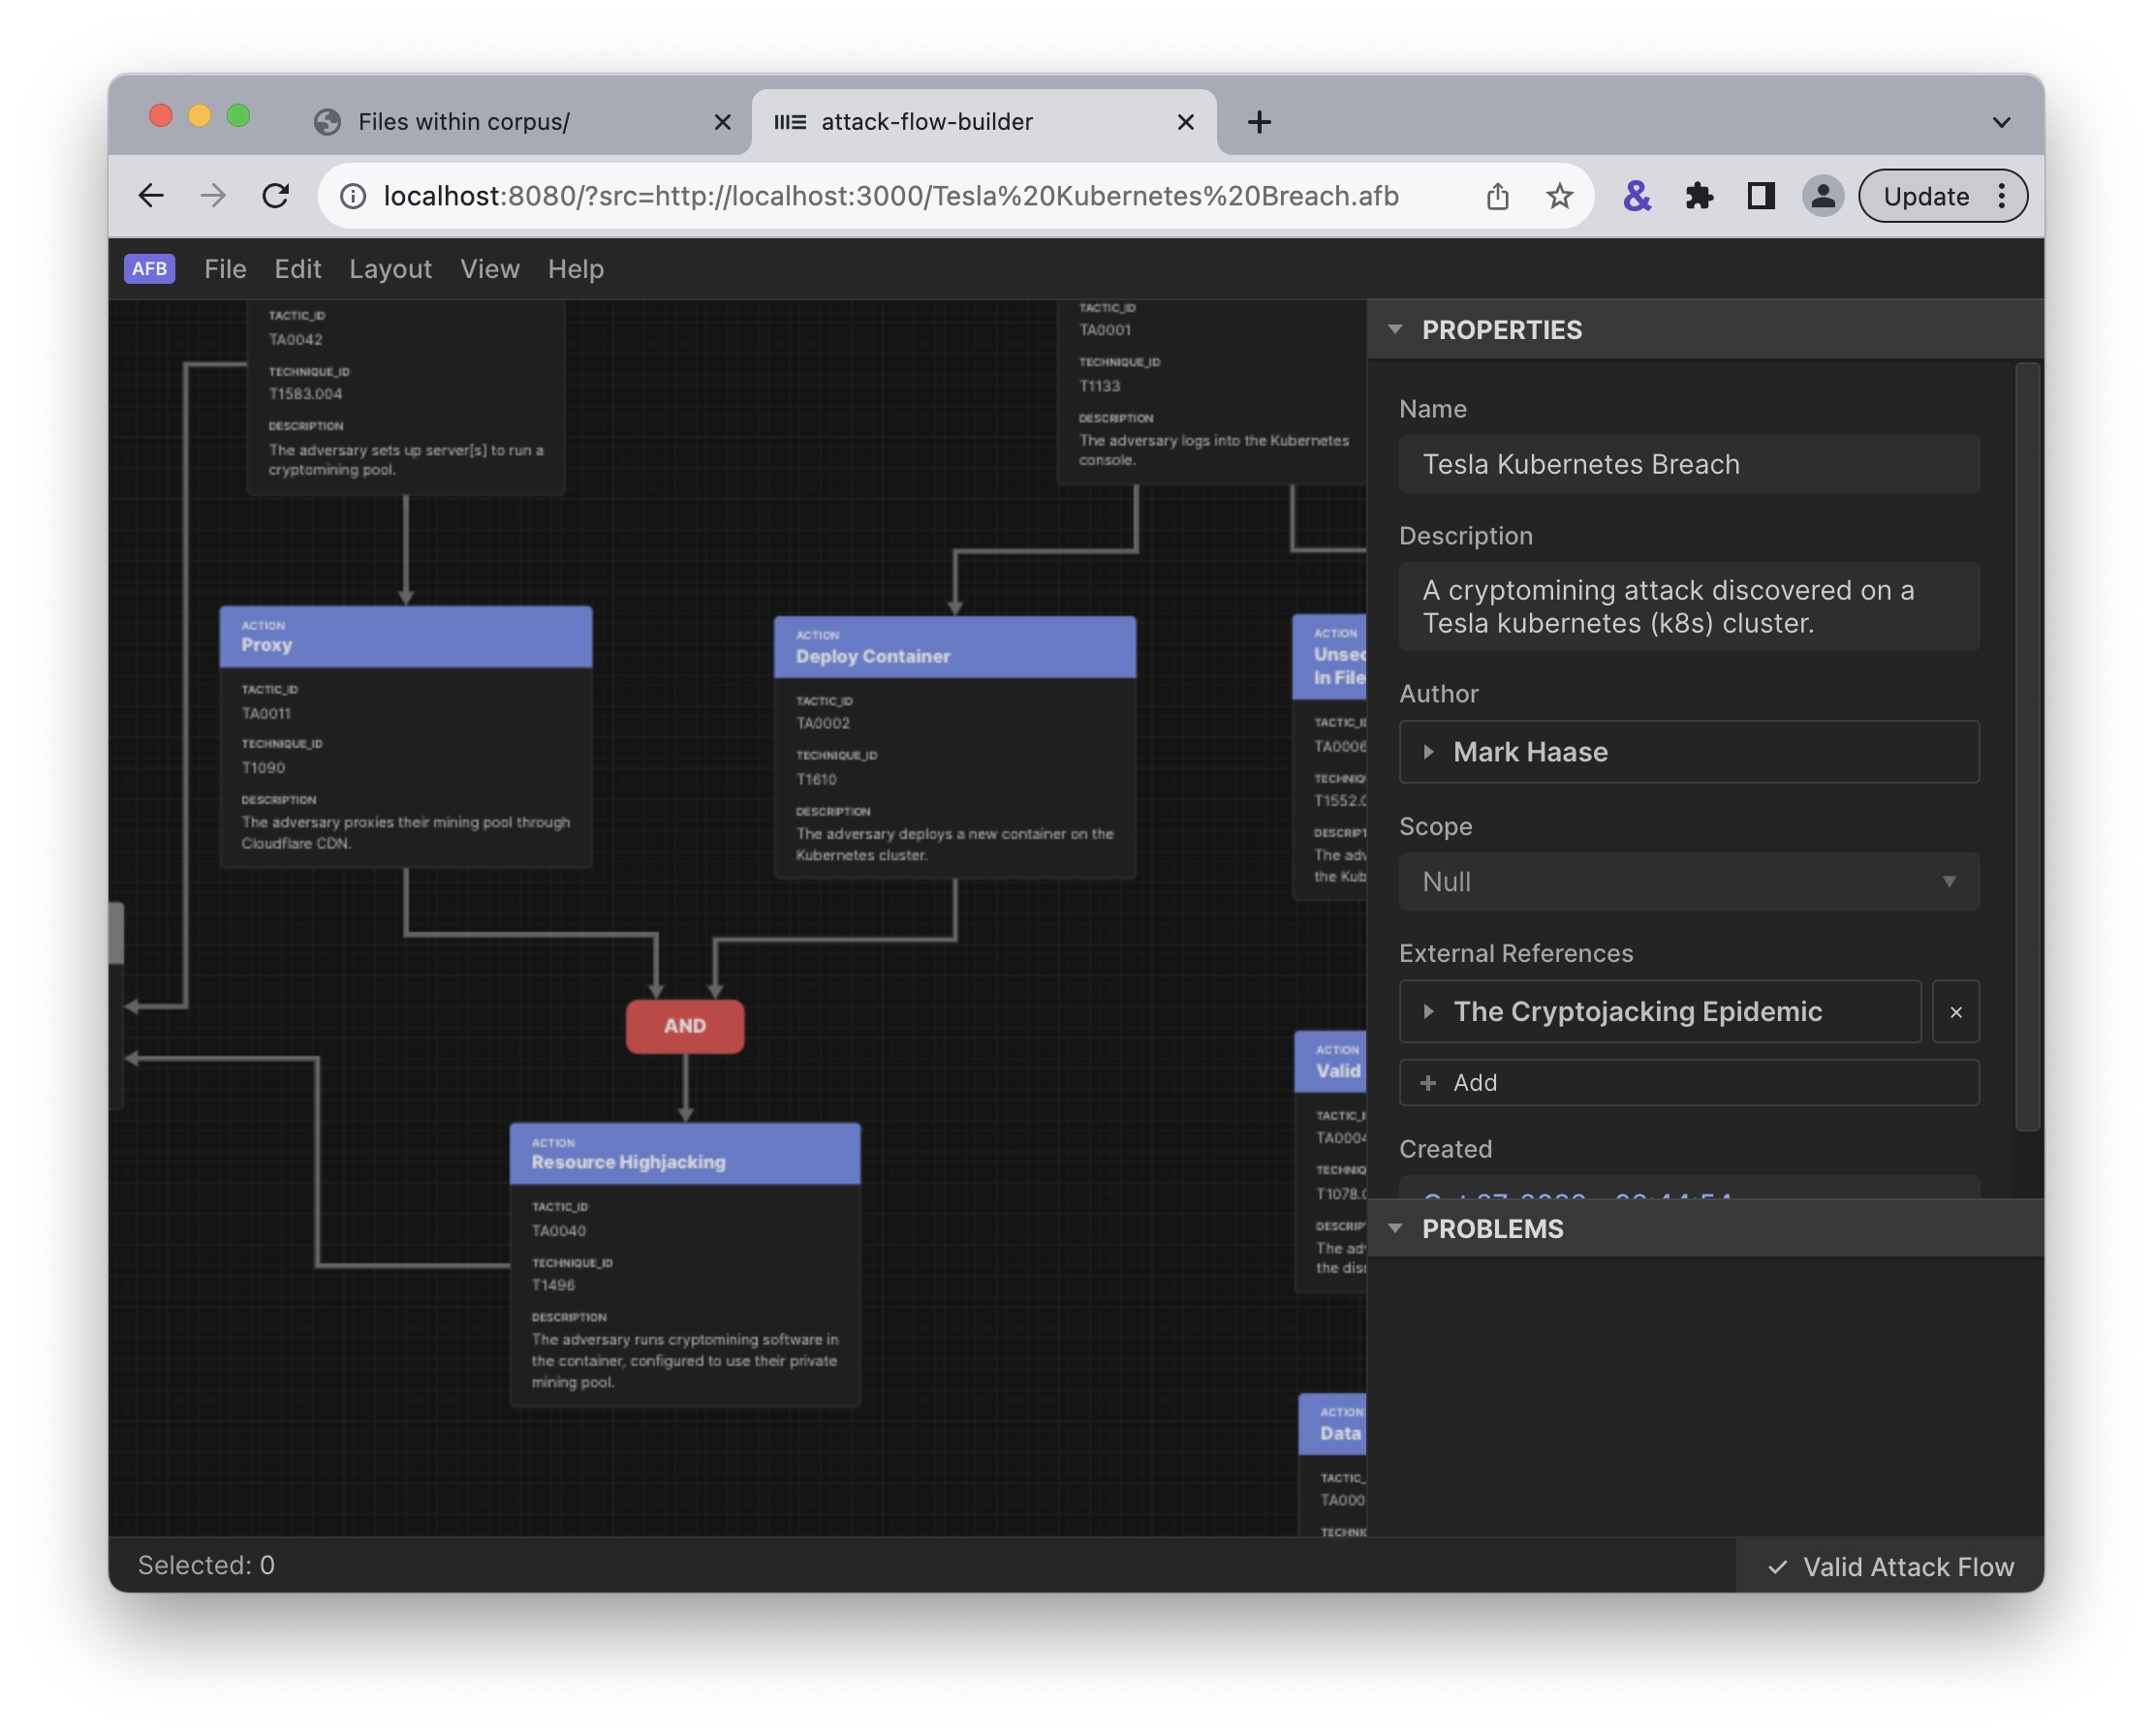
Attack Flow Builder preloads the selected flow.
This flow will be automatically loaded each time you refresh the page.
Command Line Publisher
The Attack Flow Builder also includes a command line tool for working with
.afb files. It can upgrade v2 files to v3 or publish v3 files to STIX
bundles. This script is useful
First, compile the script:
$ cd src/attack_flow_builder
$ npm run build-cli
Once the script is compiled, run the script using Node.js:
$ node dist-cli/cli.mjs --version
3.0.0

$ node dist-cli/cli.mjs --help
Usage: Attack Flow Builder CLI [options] [command]

Command line tool for working with Attack Flow Builder (.afb) files.

Options:
  -V, --version                     output the version number
  -h, --help                        display help for command

Commands:
  export-stix [options] <paths...>  Convert .afb file to STIX bundle (.json)
  upgrade-v2 [options] <paths...>   Convert v2 .afb file to v3 .afb format
  help [command]                    display help for command
The subcommand export-stix converts one or more .afb files to a STIX bundle (.json):
$ node dist-cli/cli.mjs export-stix -v ../../corpus/*.afb
Exporting ../../corpus/Black Basta Ransomware.afb -> ../../corpus/Black Basta Ransomware.json
Exporting ../../corpus/CISA AA22-138B VMWare Workspace (Alt).afb -> ../../corpus/CISA AA22-138B VMWare Workspace (Alt).json
Exporting ../../corpus/CISA AA22-138B VMWare Workspace (TA1).afb -> ../../corpus/CISA AA22-138B VMWare Workspace (TA1).json
Exporting ../../corpus/CISA AA22-138B VMWare Workspace (TA2).afb -> ../../corpus/CISA AA22-138B VMWare Workspace (TA2).json
...
The subcommand upgrade-v2 converts one or more .afb files from Attack
Flow v2 format to v3 format. It renameds the existing file .afb file with an
.afb-v2 extension so that you have a copy of the original. Then it upgrades
the file to v3 format and saves it back to its original path.
$ node dist-cli/cli.mjs convert-v2 -v ./corpus/*.afb
Renaming ./corpus/Black Basta Ransomware.afb -> ./corpus/Black Basta Ransomware.afb-v2
Saving v3 file: ./corpus/Black Basta Ransomware.afb
Renaming ./corpus/CISA AA22-138B VMWare Workspace (Alt).afb -> ./corpus/CISA AA22-138B VMWare Workspace (Alt).afb-v2
Saving v3 file: ./corpus/CISA AA22-138B VMWare Workspace (Alt).afb
Renaming ./corpus/CISA AA22-138B VMWare Workspace (TA1).afb -> ./corpus
...
The JSON files are saved back to the same location as the AFB files, using the same filename stem but with the
file extension changed from .afb to .json.
Releases
The Attack Flow project uses a MAJOR.MINOR.PATCH version scheme. All components of the project (the STIX extension, Python library, Attack Flow Builder) use the same version number for simplicity. The project uses bumpver to automate the updating of version number strings throughout the project. For example, to do a new major release:
$ bumpver update --major
INFO    - fetching tags from remote (to turn off use: -n / --no-fetch)
INFO    - Old Version: 1.0.0
INFO    - New Version: 2.0.0
INFO    - git commit --message 'Bump version 1.0.0 -> 2.0.0'
INFO    - git tag --annotate 2.0.0 --message 2.0.0
Note that the flags --minor and --patch can be used as well.
Bumpver automatically updates the version number stored in various places throughout the
project (e.g. pyproject.toml, src/attack_flow_builder/package.json,
docs/conf.py, etc), commits those changes, and creates a new tag.
Review the contents of the commit. When you are satisfied:
$ git push --follow-tags
This command will push the new commit and tag to GitHub.